|
Order & Checkout |
|

Please note that your account configuration may not allow all the features described in the Help Centre.
A shopping list contains high usage items. You can use shopping lists to select and add items to your order.
Administrators can create and edit Global shopping lists that can be shared by all users within an organization.
- If you are authorized to manage Global shopping lists, you can switch a Global list to a Personal list by opening it in edit mode.
Buyers can also create their own Private shopping lists. These can be for their own exclusive use or they can shared them with other selected buyers or with buyers using a selected account to order.
- If you are authorized to manage Global shopping lists, you can change one of your Private lists into a Global list. If that Private list was shared, the selection of buyers and accounts it was shared with will be lost.
This type of list contain the items in your contract. It is identified by the contract number in the list name. If you have more than 1 contract, you'll have as many system lists. These lists are created and maintained by Staples Professional.
Flyer lists contain items featured in our monthly flyer. This list is created and maintained by Staples Professional and is a limited time offer.
Reduction lists contain specially selected products priced for liquidation. This list is created and maintained by Staples Professional and is a limited time offer.
- Click on the Account menu, hover the Shopping tab and select option Shopping Lists.
- In the Shopping List screen, click on the Create New List button.
- Fill out the general information.
- Add products using the Add Items to list section.
- Consult the PDF how-to guide Manage and Create Shopping Lists to know all the methods available to add items to your Shopping lists.
- Save the list.
While in creation or edit mode, click the Shared check box in the List Visibility section. In the Buyers section, select the buyers you want to authorize from the Available list and click the arrow to send them to the Selected list. You could also select account numbers from your organization in the Customers section to authorize any buyer using this account to use your shopping list.
You can add the product shown in the Product Details page by using the Add to Shopping List option. Select a shopping list from the drop-down list and click on Add To List.
You can add all the items in your shopping cart to an existing shopping list by using the Add to Shopping List option at the bottom of cart details. Select a shopping list from the drop-down list and click on Add To List.
You can add all the items in your submitted order to an existing shopping list by using the Add to Shopping List option at the bottom of order details. Select a shopping list from the drop-down list and click on Add To List.
- Click on the Account menu, hover the Shopping tab and select option Shopping Lists.
- In the Shopping List screen, click on a list name to open the list detail.
- Click in the check boxes of all the items you want to order and click on the Add Selected button.
- Click on the Account menu, hover the Shopping tab and select option Shopping Lists.
- Find the shopping list you want to add to your order and click on Add to Cart on that line.
- This function is not available for Flyer and Reduction lists as well as for any list that contains more than 50 items
A template order allows you to reuse the same order several times, without having to build it each time. You only have to create the order in your basket once and save it as a template order for future use.
- Simply click on the link at the top of your shopping cart.
- Doing this empties your cart and opens the template page.
- The account selected at the time the template is created is automatically associated to the template.
- To access your templates, click on the Accountmenu, Orders tab, and on option .
- Once your template is created, if you want to proceed with the order as well, simply click on in the template page to load the products back into your shopping cart.
Once all the products have been added to the shopping cart:
- Click on to access the Delivery Details page.
- You can select Delivery or Pick-up, Installation, and Pre-assembly.
- Click on and then click on .
- When you move your Template to a new shopping cart, your service options will follow as previously defined.
- When you copy your Template to an existing shopping cart, your service options will follow, unless your current cart already has service options defined, in which case, only the pre-assembly options will follow from your template.
- Click on the Accountmenu, hover the Orders tab and select option .
- Find the order to retrieve in the Templates list and click on its .
- In the template's Order Information page, click on the button to add all the products from the template to your current order.
- You could also click on the button to delete your current order and replace it with the template.
- That included the template's products as well as its ship-to account. The template itself is then deleted.
- Open the template by clicking on its number in the Templates list.
- Click to add the template's products into a new shopping cart.
- The template will be deleted.
- Make the necessary changes in the shopping cart page and click on to create your new updated template order.
-
Use the field to enter a quantity and the Add to Cart button found in :
-
the Product Search results
-
the Quick View pop-up
-
the Product Details screen
-
the Product Recommendations
-
the Shopping List details
-
-
You could also add a complete Shopping List or a complete Template Order to your cart.
-
In the Shopping Cart page, the Product Entry line is used to add items to the order by entering their product codes.
-
Use the Quick Add section to search for items and add them to your cart using the + Add to Cart button.
-
Enter the Item number in the search field.
-
The item number can be an eway product code, an alternative code, a custom customer code (if applicable).
-
If the product you are looking for exists on eway, the results are displayed immediately, including the different sales multiples and different variants of the item.
-
Depending on the sales multiple of the item, the quantity added to the cart can be 1 or a higher number depending on the sales multiple of the item added.
-
-
- In the Settings section of the Edit My Profile page, you can choose to have the product appear on a new line with each addition or have the quantity increase on a single line.
- Look for the Merge same products into 1 line on Shopping Cart? option. Select Yes to force grouping on one line or No to prevent grouping. Your selection will be reflected on the final invoice.
- This option also exists at the account level, managed by your Administrator.
- Select Use Client Settings in your profile to choose the account default.
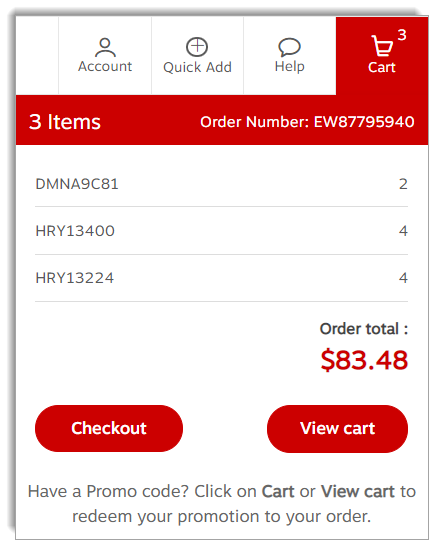
The cart summary provides a continuous view of your shopping cart. It contains:
- The order number.
- The number of items in your cart
- The order total, including taxes.
- The last 5 items added to order and the ordered quantity.
- The View Cart button to open the Shopping Cart page.
- The Check Out button to start the process to submit your order for processing.
Depending on your account configuration, a message to add a promotional code may appear.
Comments / notes are for your reference. This note will appear on your invoice. There are some eway functions that automatically add a reference here, but you can always add your own comment or reference next to it.
Notes should not be used to specify alternate delivery instructions, to communicate with Customer Care or your Sales Representative.
Simply enter the new quantity.
Careful! If you enter 0, the product will be removed for the order!
- In the Settings section of the Edit My Profile page, select Yes for the Show last item added to shopping cart on top function, to have the items in reverse order that they were entered.
- Click on No to have the products in the same order as they were entered.
- This setting does not affect how the products are shown on the invoice.
On the Shopping Cart page, the item number search field is available for you to search for products and add them to your cart using the + Add to Cart button.
Enter the Item number in the search field.
The item number can be an eway product code, an alternative code, a custom customer code (if applicable).
If the product you are looking for exists on eway, the results are displayed immediately, including the different sales multiples and different variants of the item.
Depending on the sales multiple of the item, the quantity added to the cart can be 1 or a higher number depending on the sales multiple of the item added.
Depending on your account configuration, the Enter Promo Code button may appear above the cart.
-
If you have been given a promotional coupon code, click on the Enter Promo Code button.
-
The Order Total pane, located in the lower right corner of the screen, opens.
-
Enter your promotional code in the field and click on the Apply button.
-
A success message is displayed below the field if the code entered is valid.
-
You can click on the Remove link to remove the entered code.
-
An error message is displayed if the promotional code entered is not valid.
-
-
- Open the Shopping Cart page and click on the Need a catalogue button located at the right, above the cart.
- A pop-up window containing all the catalogues your account can use allows you to select the publication you wish to receive and in which quantity.
- Once a catalogue is added to your shopping cart, you can change the quantity, add a note or delete it just like any other item.
- Certain conditions can prevent you from seeing the Need a catalogue button .
- Your account is not authorized to have this feature. Contact your sales rep for more information.
- Your shopping cart is empty. You need at least 1 regular item in your order to add a catalogue.
- You have already ordered a catalogue for this account in the past. One catalogue order per buyer/ship-to account combination until the feature is reset when a new catalogue comes out.
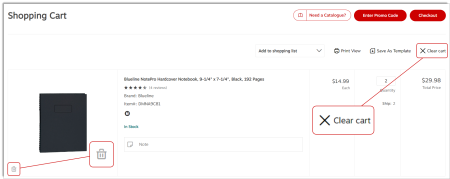
- Delete products in the cart by clicking on the bin at the left that displays below the product's image.
- You could also enter 0 (zero) in the product's Quantity field.
To delete the all the items and begin with an empty cart, click on Clear Cart.
Click on the Save as Template link at the top of your shopping cart. Doing this empties your cart and opens the Template detail page.
The account selected at the time the template is created is automatically associated to the template.
Once your template is created, if you want to proceed with the order as well, simply click on Copy to Cart in the Template detail page to load the products back into your shopping cart.
Click the Print View link on the Shopping Cart page. Make sure you set your print format to landscape.
When customers enrolled in the Fifty Green program submit an order below the $50 minimum level, a charge is added to support our Fifty Green initiative. To prevent this charge from being added, you may continue shopping to bring your order total over $50 before taxes. The Fifty Green screen recommends popular items you can conveniently add to your order.
If you wish to proceed with your order, you'll be pleased to know that a portion of each fee collected helps to buy a tree as part of the Tree Canada donation program.
This page is displayed if your order contains Switch to Eco opportunities.
Switch to Save means that there is a cost saving alternate product available.
This is your chance to take advantage of these alternate products before completing the checkout process. You can switch one or all the products presented. A couple of indicators are added to the product line to show that you switched: the original product code appears as a reference and the amount saved if applicable.
This page is displayed if your order contains Switch to Eco-friendly opportunities.
Switch to Eco-friendly means that there is an environmentally friendly alternate product available.
This is your chance to take advantage of these alternate products before completing the checkout process. You can switch one or all the products presented. A couple of indicators are added to the product line to show that you switched: the original product code appears as a reference and the amount saved if applicable.
This page appears only if there are items on the order that have required or recommended accessories that have not already been added to the cart.
Required Accessories are not included with the ordered product but are needed in order to be used. Recommended Accessories can enhance the ordered product but are not required to use it. You can add accessories to your order directly from this screen. Click on the Next button to go to the next step in the Checkout process.
- This page shows you the products that eway will automatically remove from your order before starting the Checkout process.
- This screen appears when your order contains an unauthorized product or it has exceeded the maximum amount allowed for a product group or an order line. These restrictions are set by your organization in your account set-up.
- You have 2 options: click on the Return to Cart button to make changes to the order or click on the Checkout button to have the listed products removed automatically.
Upon checkout, you may have the option of creating your own personalized profile, depending on the account setup you are using.
This functionality is generally associated with accounts such as Employee Purchasing Program.
-
By creating your own profile, you will see the account as if it were your own, you will be able to view your order history, create shopping lists, templates and save your payment methods.
In the Delivery Details page of the Checkout process, simply key in the new address over the default shipping address.
If some or all of these fields are locked (grey), your organization has requested that we prevent address modifications. You can try choosing an alternate preset shipping address by returning to the shopping cart and selecting a new account.
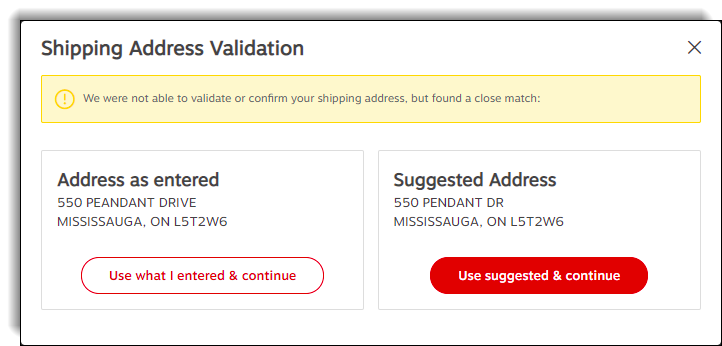
- If you change one of the address field during checkout, a window may display in order to confirm the address entered is accurate.
-
Select the address you entered or the suggested address to continue.
Upon checkout, you may have the option to add shipping addresses, depending on the setup of the account you are using. This feature enables you to manage the delivery addresses for your orders.
-
Click on the Add a new address button and save your delivery addresses to save time on your next orders.
-
All the addresses you define will be available for your future orders.
-
Depending on how your account is set up, one of the following three methods will be available before proceeding to checkout, to allow you to select another account:
-
You can click the on the Ship to location link located in the header to change the shipping address.
-
From the drop-down list, select the appropriate account for the delivery of the order.
-
-
You can click on the postal code located in the upper right corner of the screen to enter a new postal code.
-
You can click on the postal code located in the upper right corner of the screen to add or select a different delivery address.
If there is a Special Delivery item in your cart, such as furniture, you'll have to select your Special Delivery options.
- You can choose to have your order delivered or you could pick it up at our warehouse.
- If you select Delivery, you can choose to have these items installed. This means unwrapping, assembling and positioning the items.
- If you select Pick-up or Delivery without Installation, you can still take advantage of our pre-assembly service on eligible products. For a small fee, this service could save you a lot of valuable time.
Your account's Delivery Address appears by default. Make any required changes here. You may need to add Contact Information.
In this section, write down your delivery instructions in the field named Delivery instruction. This field shouldn't be used to specify an alternate delivery address or for Special Delivery items (furniture).
This section is displayed only when the order contains at lease 2 or the following 3 types of items: Special Delivery, Drop Shipment and regular items that do not require special delivery.
This section contains messages about delivery methods. Special Delivery messages are preceded by the blue truck icon and Drop Shipment messages are preceded by the black truck icon.
This section is displayed only when the order contains only Drop shipment items or only Special Delivery items to be delivered or delivered and installed. It contains a message about the delivery process.
This section is displayed only when the order contains items that require Special Delivery that you chose to pick-up from our warehouse. This section contains messages about the pick-up process.
The Delivery Options section may appear depending on your account set-up and the items you ordered. Delivery options may include Standard delivery (next business day), Scheduled delivery (on a set delivery date) and Same Day / Rush delivery (faster than standard delivery). Please note that these delivery options do not apply to Special Delivery items.
This section appears if you have Special Delivery items to be delivered or delivered and installed. Answer all the questions in the section to ensure a smooth delivery.
The following payment methods are available:
- Place this order on account - choose this option if you do no want to use credit card payment.
- Use the credit card provided in my account - choose this option to use the permanent credit card number entered in your customer account.
- Use the credit card loaded in my profile - choose this option to use the permanent credit card number entered in your eway Buyer profile. If you have a choice of multiple credit cards (your own or shared by other buyers), select the appropriate number from the drop-down list. If this credit card has expired, you will not be allowed to submit the order until your profile is updated.
- Use the credit card provided with this order - choose this option when you wish to use a credit card that is not entered in your client account or in your Buyer profile. Enter the required information in the Credit Card Information section and click on Add Card.
If a preferred method is specified in your profile, it will automatically be selected for you. To set your preferred payment method for future orders from the Payment Details page, select a payment method from the available choices and click on the Set As Default button.
In the Payment and Credit Card Information section of the Edit My Profile page, you may select your Preferred Payment Method from the drop-down list. This sets the default payment method that will be automatically selected when you checkout.
This section contains your buyer information, modify the information if required.
In the top field, enter an internal comment that will be useful to you when you query your submitted orders and click on the Post Comments button.
- If your order requires approval before being sent for processing, a message will indicate the reason for the required approval. Click on Show/Hide details to learn more about this warning.
- The Approvers section appears if your order requires approval and your buyer profile allows you to select which approver from your group will receive the notification email. Check the boxes next to each person you want to select. You must select at least one approver. The system will remember your selection and show that as the default for your next order.
This section appears only when a promotion that requires a coupon code is available to you.
Some items that are bulky or heavy may require special handling delivery. In some remote areas, a product handling fee could be added to reflect the higher delivery costs.
There are some items that will be restricted in some very remote areas because of the prohibitive delivery costs.
Purchase Order (PO) policies are implemented at the sole discretion of your company. Depending on your company’s policy, you may be required to enter a purchase order number in the Review & Confirm page of the Check Out process.
Your company may require a mandatory PO, a written PO or a PO with specific criteria. You accounts can be setup to display a message and prevent an order from being process if the information is not entered correctly.
To obtain more information on your company’s Purchase Order policy, please reach out to your purchasing department.
If you would like to implement a Purchase Order policy for your company by requiring POs for users to submit orders, contact one of our experts in the Customer Care for assistance.
Your company may use or require the use of Purchase Orders (POs) to place orders on eway.com. A PO is the document generated by a buyer at your company to authorize a purchase transaction. If POs can be used, or are required to place orders, you will see a field to enter this information in the Review & Confirm page of the Check Out process.
Click on the Account menu, hover on the Orders tab and select option Backordered Items. A list of your back ordered items is displayed.
- Click on the Account menu, hover on the Orders tab and select option Backordered Items.
- Click on the red Cancel Item link below the item to cancel that back order.
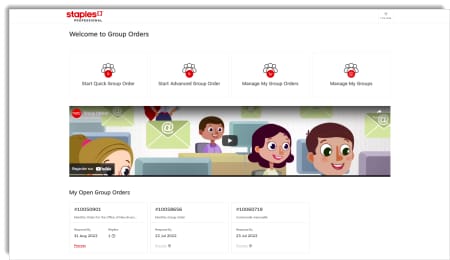
Group orders allow existing eway users to invite their co-workers (registered eway buyers or not) to shop eway and request products they would like to have ordered. By combining small orders this way, an organization saves money, time and paperwork while helping the environment.
-
From the Account menu, hover the Orders tab and select option Group Orders.
-
Select Start Quick Group Order if you wish to manage the invitations outside of eway.
-
You only need to give the order a name and set an end date and you will receive an invitation in your inbox that you can then forward to your invitees.
-
-
From the Account menu, hover the Orders tab and select option Group Orders
-
Select Start Advanced Group Order if you wish to manage your invitations in eway.
-
In the advanced group order, you get to name all you invitees, even create groups, and select from multiple options such as setting a reminder date.
-
Anyone with an email address can be invited to join a group order. They don’t need to be registered as eway buyers.
-
Click on the Account menu.
-
Click on the Orders tab and select option Group Orders.
- Click on Start Quick Group Order or Start Advanced Group Order.
- Quick Group Order
- Enter the name of the group in the Group Order Description field.
- From the calendar, specify the date limit when the invitees should have responded.
- Click on Send Invitation.
- Advanced Group Order
- Enter the group name in the Group Order Description field.
- Fill out the fields in the General Information section .
- Click on Next Step.
- Build your invitees list by entering the names and email address of each individual, by adding an existing group of individuals, by crating a new group of individuals.
- Click on Send Invitations.
- Quick Group Order
For the person that is in charge of processing the group order, when you transfer a group order's content in your cart, all the usual options are available to add or delete items from the cart.
- Click on the Account menu.
- From the Orders tab, select option Group Orders.
- Click the Manage my Group Orders.
- Select an order from the list.
- Click on the recycle bin
 icon to Delete the group order.
If you've received an invitation to a quick group order, click on the link to reach eway. Please identify yourself by entering your name and email address.
This information will be used to let the buyer know that you added items to the order, to associate these items with your name and to send you an order confirmation by email.
There are several methods to add products in the cart:
- By using the product category menus below the search field.
- By searching a product in the search field.
- By clicking on the products recommendations at the bottom of the screen.
- Using the Quick Add feature, by adding searched products.
- By opening the cart and adding products using their code.
- From a shopping list.
- When invitees process their orders, an email is sent to them to confirm the items that were submitted. An email is also sent to the order’s creator to inform them of the items that were added to the order and the person who ordered them.
- The group order remains on stand-by until the order’s creator decides to process it. At that point, the invitee will receive a final email confirming the completed order.
- A confirmation email is also sent to invitees in some cases when a group order is deleted.
The account must be selected before the group order is created. The account number is used to provide pricing and availability throughout the ordering process and cannot be changed mid-way.
The Reply By Date can be changed by using the pencil icon  in the Manage My Group Orders page. Once the new date is set, all your invitees will automatically receive a reminder email informing them of the new date.
- Access the Manage My Group Orders page.
- Select the order and click on the pencil icon .
- Invitees can only be changed for advanced group orders.
- Click on Next Step to access the Group Order invitations grid.
- To remove one or more individuals:
- Select their names in the list and click on the recycle bin icon . If the notification option was selected, an email will be sent to those individuals to inform them they were removed from the group order. Any item submitted by one of these individuals is automatically removed from the group order shopping cart.
- Select their names in the list and click on the recycle bin icon
- To invite a new individual:
- Enter the information of the individual to invite in the Add Individuals drop-down window and click on Add. Their status will be New.
- Click on Send Invitations to send them the link to the group order.
For a quick group order, it’s simply a matter of resending the invitation email you received when you created the order.
For an advanced group order, you can open the order with the pencil icon and use the Send Email Notification button at the right of the Reply By Date field, to send an email to all invitees.
To send it to just one person, you can delete them from the order and add them again. When you click Send Invitations, only the “New” person will receive it.
In an advanced group order, you can set a date when a reminder email is automatically sent to your invitees.
You could also click on the pencil icon to open the order and click on the Send Email Notification button at the right of the Reminder Date field.
In a quick group order, simply resend the email invitation you received originally. You may want to change the message to make it a reminder.
The link in your invitation should be valid for the whole time while the group order is open. The end date is shown in the email.
This link is good for only one order per person. If you have already submitted a cart, this link was deactivated.
The link could also be deactivated if the group order was processed or deleted by its creator or if your invitation was cancelled. Contact the order creator for more details. Their name and email address appear in the email.
As soon as they submit their cart to the group order, you receive an email confirmation with their name and all the items they ordered.
You can also go into the Manage My Group Orders page and click on the eye  icon to view the replies.
In an advanced group order, this notification is optional.
Make sure you receive these order confirmations by clicking on the pencil icon and checking the Notify me when invitee replies box.
This situation occurs when your cart already contains items from a previous group order that was not yet processed. Open your cart, submit your order and the Process button will become available again.
It's also possible that the button is grayed out because no one has responded to the group order invitation yet.
-
The Submitted Orders list is accessible through the Account menu, Orders tab and Submitted Orders option.
-
Your orders from the last 30 days are also quickly accessible from the Orders shortcut tile, located below the main banner.
-
Click on the order number to open its detail.
-
-
Also in the Orders shortcut tile, you can perform an order search by entering your order number in the search bar.
-
The corresponding results of your complete order history are displayed.
-
Click on the red order number to open the Order Details page.
-
If you don't get any results, you can click the Find Your Order red link to do more research.
-
In your submitted orders list, click on the order number to open the order details page.
- Click on the Account button, on the Orders tab and select Submitted Orders. In the orders list, the order status appears at the right end of each line.
- Awaiting Approval - the order requires approval from someone in your organization.
- Open - the order is being processed and has not yet been fully shipped. Among others, this status includes orders in which an item is still on back order. Click on the order number to view order tracking information.
- Rejected - the order was cancelled by the person responsible for approving orders in your organization.
- Shipped - the order is now delivered. Click on the order number to view the proof of delivery.
- Cancelled - the order was cancelled by the buyer.
- Archived - Submitted and approved orders older than 12 months. These orders only contain details based on the order originally submitted, some information is no longer current.
You must contact Customer Care as quickly as possible as they may be able to recover the order and make your changes.
If your order is awaiting approval, you can access it by clicking on the order number and then click on the Modify Order link to enter your changes. If your order is not subject to approval, you must contact Customer Care as quickly as possible as they may be able to retrieve the order and make your changes.
You must contact Customer Care and they might be able to cancel your order.
As long as your order is still in your Submitted Orders list, you can click on the order number to open the order details. For shipped orders you can click on the red invoice number at the top of the page to get a copy of the original invoice.
If your order is divided on several invoices, each product section will show the corresponding invoice number in the header.
If the order is too old to be part of your Submitted Orders list, get in touch with one of our Customer Care associates.
- From the submitted orders list, click on the Buy Items Again button for a chosen order.
- From the submitted orders list, click on the red order number of a chosen order to open its detail and click on the Buy Items Again button.
- Click on the Buy Again button for each product you wish to reorder.
- A pop-up window containing the product's details will open.
- Adjust the quantity as required and click on Add to Cart to add the item to your order.
- From the submitted orders list, click on the red order number to open its detail page.
- Click on the Print View link at the top of the page.
- Click on the Print button.
- From the submitted orders list, click on the red order number to open its detail page.
- Click on the Print View link at the top of the page.
- Click on the Email tab.
- Enter the recipient's email address and click Send.
- From the submitted orders list, click on the red order number to open its detail page.
- Click on the arrow to open the Add to shopping list drop-down.
- Select the appropriate shopping list.
- Click on the red link Add to shopping list that displays.
- The icon identified by a padlock indicates that the order is being modified by another user, usually, a person responsible for approving orders.
- Hover your cursor over this icon to see the name of the user who is "locking" your order.
- If the person exits the order modification screen incorrectly, the order will remain locked until they goes back in and exit by clicking the Back button or the Update button.
- If they are unable to release the order and it is still locked after 4 hours, the system will release it automatically.
- Contact our Customer Care if the order remains locked for more than 4 hours.
You haven't found your order using the Submitted Orders page or in the Orders shortcut tile below the main banner on the home page? Try again with the Find Your Order page.
-
Sign In on eway.
-
Click on this link : Find Your Order.
-
Enter your eway order number.
-
Enter the postal code associated with the order.
-
Start the Search.

Last Update : January 25, 2024
© Staples Canada ULC | All rights reserved.